From web to client: The Mastodon experience

Mastodon is an open-source social networking platform for microblogging. While it has a web-based interface, many users prefer to use a client to access Mastodon. Clients are programs or applications that allow users to access and interact with the Mastodon platform from various devices, including computers, tablets, and phones. I moved to Fosstodon in 2019, and it has become my primary social networking site.

Web Interface

Like most users, I started using the Mastodon web app by pointing my browser at joinmastodon.org. I found an instance to join, created an account, and logged in. I used the web app to read, like, and reblog posts from my favorite Mastodon users. I also replied to posts without ever having to install anything locally. It was a familiar experience based on other social media websites.

The disadvantage of the web app is that it lacks the richness of a dedicated Mastodon client. Clients provide a more organized and streamlined interface, which makes it easier to navigate, manage notifications, and interact with others in the fediverse. Clients also make it easier to find and generate useful hashtags, which are essential to sharing your message in a non-algorithm-driven environment.

Mastodon is open source, though, so you have options. In addition to the web apps, there are a number of Mastodon clients. According to Mastodon, there are nearly sixty clients for Mastodon available for desktop, tablet or phone.

Clients

Each client app has its own unique features, UI design, and functionality. But they all ultimately provide access to the Mastodon platform:

I started my client journey with the Mastodon app for iOS. The app is easy to use and is open source. The app is written in Swift. It is the official iOS app for Mastodon.

I moved to MetaText which is no longer being developed. I liked the Metatext interface. It made interacting with Mastodon easier on my iPhone. Metatext is open source with a GPL v3 license.

I am currently using Ice Cubes which is my favorite Mastodon app for both iOS and MacOS. Ice Cubes has everything I was looking for in a Mastodon client. Crafted using SwiftUI technology exclusively, this application boasts impressive speed, minimal resource consumption, as well as user-friendly functionality. It features an intuitive design framework on iOS devices like iPhone/iPad and MacOS systems.

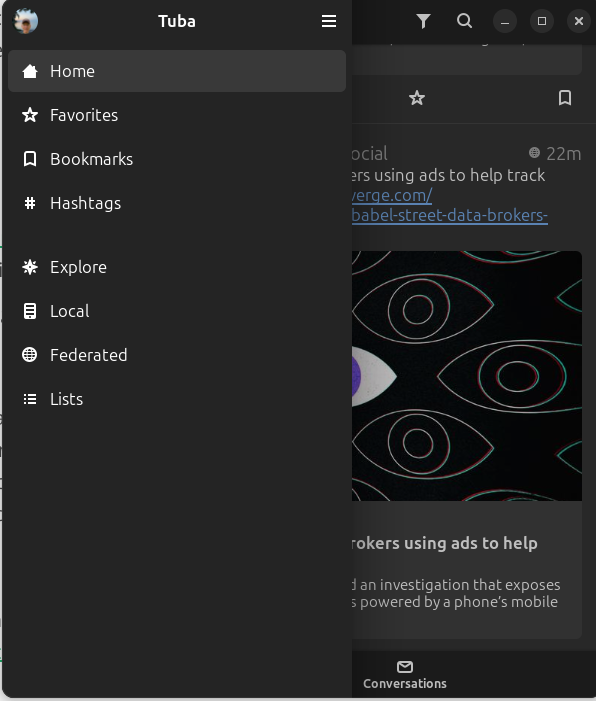
My favorite desktop Linux app for Mastodon is Tuba. It is available as a Flatpak. It’s intuitive and easy to use. Tuba is open source with a GPL v3 license.

Screen picture by Don Watkins CC by SA 4.0

How is Mastodon changing your reading habits? What are your favorite apps? Be sure to comment.

Open WebUI: A nuanced approach to locally hosted Ollama

Open WebUI offers a robust, feature-packed, and intuitive self-hosted interface that operates seamlessly offline. It supports  various large language models like Ollama and OpenAI-compatible APIs,  Open WebUI is open source with an MIT license. It is easy to download and install and it has excellent documentation. I chose to install it on both my Linux computer and on the M2 MacBook Air. The software is written in Svelte, Python, and TypeScript and has a community of over two-hundred thirty developers working on it.

The documentation states that one of its key features is effortless setup. It was a easy to install. I chose to use the Docker. It boasts a number of other great features including OpenAI API integration, full Markdown and Latex support, a model builder to easily create Ollama models within the application. Be sure to check the documentation for all nuances of this amazing software.

I decided to install Open WebUI with bundled Ollam support for CPU only since my Linux computer does not have a GPU. This container Image unites the power of both Open-WebUI and Ollama for an effortless setup. I used the following Docker install script copied from the Github repository.

$ docker run -d -p 3000:8080 -v ollama:/root/.ollama -v open-webui:/app/backend/data --name open-webui --restart always ghcr.io/open-webui/open-webui:ollama

On the MacBook I chose a slightly different install opting to use the existing Ollama install as I wanted to conserve space on the smaller host drive. I used the following command taken from the Github repository.

% docker run -d -p 3000:8080 --add-host=host.docker.internal:host-gateway -v open-webui:/app/backend/data --name open-webui --restart always ghcr.io/open-webui/open-webui:main

Once the install was complete I pointed my browser to:

http://localhost:3000/auth

I was presented with a login page and asked to supply my email and a password.

Screen picture by Don Watkins CC by SA 4.0

First time login will use the ‘Sign up’ link and provide your name, email and a password. Subsequent logins require email and password. After logging in the first time you are presented with “What’s New” about the project and software.

After pressing “Okay, Let’s Go!” I am presented with this display.

Screen picture by Don Watkins CC by SA 4.0

Now I am ready to start using Open WebUI.

The first thing you want to do is ‘Select a Model’ at the top left of the display. You can search for models that are available from the Ollama project.

Screen picture by Don Watkins CC by SA 4.0

On initial install you will need to download a model from Ollama.com. I enter the model name I want in the search window and press ‘Enter.’ The software downloads the model to my computer.

Screen picture by Don Watkins CC by SA 4.0

Now that the model is downloaded and verified I am ready to begin using Open WebUI with my locally hosted Phi3.5 model. Other models can be downloaded and easily installed as well. Be sure to consult the excellent getting started guide and have fun using this feature rich interface. The project has some tutorials to assist new users. In conclusion, launching into an immersive experience through their intuitively designed interface allows users of Open-WebUI to fully leverage its comprehensive array of features.

Urgent Call for Assistance in the Wake of Hurricane Helene’s Devastation on North Carolina

In recent weeks, climate change has wrought untold hardship upon the mountain communities of Western North Carolina. The infamous and powerful Hurricane Helene mercilessly swept through these areas with little warning or respite for those in its path, leaving a trail of destruction that has brought to light both resilience and suffering among local residents.

Volunteers from the organization BonaResponds have been at the forefront since their arrival on-site last weekend—traveling through towns such as Burnsville and Green Mountain bringing hope in a time of despair by providing immediate relief to those affected. Their actions were recognized this morning when Jim Mahar was interviewed Olean area radio station WPIG.

The BonaResponds team has already accomplished significant tasks, including aiding in delivering essential supplies such as food and clothing which had been collected by the Franciscan Sisters of Allegany which is highlighted in a news article in the Olean Times Herald.

In addition to these laudable efforts, there remains a critical need for further assistance as winter’s biting chill descends upon mountain towns already burdened by loss. With many homes left without power—a situation predicted to persist through the season—the urgency of support has never been more pronounced nor direly necessary.

In light of this, we extend a heartfelt plea for any form of aid that can bring solace and some semblance back into these communities’ disrupted lives: connectors compatible with propane tanks to keep warmth alive amidst the freezing temperatures have become an essential commodity. There is a pressing need for generators to supply homes in the area with electrical power. Electric generators with a recommended size is 3600 watts of sustained power.

Here’s how you can provide assistance effectively and immediately to BonaResponds:

  • Financial Support – Direct donations are accepted via mail at their onsite address: BonaResponds, St. Bonaventure NY 14778 Alternatively for convenience or anonymity reasons, please consider supporting through PayPal by visiting PositiveRipples website as suggested in the interview with Jim Mahar..

The communities in Western North Carolina have shown tremendous courage in confronting this calamity head-on; they are resilient and hardworking individuals who deserve our assistance. We welcome your help and prayers while assisting them in their need.

Fastfetch: High-Performance Alternative to Neofetch for System Information Display

Yesterday I wrote about Neofetch which is a tool that I have used in the past on Linux systems I owned. It was an easy way to provide a good snapshot of the distribution I was running and some other pertinent information about my computing environment. One of my readers replied to let me know that the project was no longer being maintained. It was last updated in August 2020. The commenter suggested that I check out Fastfetch. I thanked the reader and followed the link he provided to the Github repository for Fastfetch.

The project maintains that it is, “An actively maintained, feature-rich and performance oriented, neofetch like system information tool.” It is easy to install and provides much of the same information that was provided by Neofetch. However, it does supply your IP address but the project maintains that presents no privacy risk. The installation for Fedora and RPM based distributions is familiar by entering the following command.

$ sudo dnf install fastfetch

If you are a Ubuntu based distribution like my Linux Mint daily driver then the installation requires the download of the appropriate .deb file. Once the package was installed on my system I decided to try it.

Screen picture by Don Watkins CC by SA 4.00

Fastfetch can be easily installed on a MacOS with Homebrew. I decided to try it on my MacBook.

Screen picture by Don Watkins CC by SA 4.0
% brew install fastfetch

Fastfetch is written in C with 132 contributors. It is open source with an MIT license. In addition to Linux and MacOS systems you can install Fastfetch on Windows with Chocolatey. The project states that Fastfetch is faster than Neofetch and it is actively maintained. Fastfetch has a greater number of features than it’s predecessor and if you want to see them all enter the following command. For more information and examples be sure to visit the project wiki

Exploring Hollama: A Minimalist Web Interface for Ollama

I’ve been continuing the large language model learning experience with my introduction to Hollama. Until now my experience with locally hosted Ollama had been querying models with snippets of Python code, using it in REPL mode and customizing it with text model files. Last week that changed when I listened to a talk about using Hollama.

Hollama is a minimal web user interface for talking to Ollama servers. Like Ollama itself Hollama is open source with an MIT license. Developed initially by Fernando Maclen who is a Miami based designer and software developer. Hollama has nine contributors currently working on the project. It is written in TypeScript and Svelte. The project has documentation on how you can contribute too.

Hollama features large prompt fields, Markdown rendering with syntax highlighting, code editor features, customizable system prompts, multi-language interface along with light and dark themes. You can check out the live demo or download releases for your operating system. You can also self-host with Docker. I decided to download it on the M2 MacBook Air and my Linux computer.

On Linux you download the tar.gz file to your computer and extract it. This opened a directory bearing the name of the compressed file, “Hollama 0.17.4-linux-x64”. I chose to rename the directory Hollama for ease of use. I changed my directory to Hollama and then executed the program.

$ ./holllama 

The program quickly launches and I was presented with the user interface which is intuitive to an extent.

Screen picture by Don Watkins CC by SA 4.0

At the bottom of the main menu and not visible in this picture is the toggle for light and dark mode. On the left of the main menu there are four choices. First is ‘Session’ where you will enter your query for the model. The second selection is “Knowledge” where you can develop your model file. Third selection is ‘Settings’ where you will select the model(s) you will use. There is a checkoff for automatic updates. There is a link to browse all the current Ollama models. The final menu selection is ‘Motd’ or message of the day where updates of the project and other news are posted.

Model creation and customization is made much easier using Hollama. In Hollama I complete this model creation in the ‘Knowledge’ tab of the menu. Here I have created a simple ‘Coding’ model as a Python expert.

Screen picture by Don Watkins CC by SA 4.0

In ‘Settings’ I specify which model I am going to use. I can download additional models and/or select from the models I already have installed on my computer. Here I have set the model to ‘gemma2:latest’. I have the settings so that my software can check for updates. I also can choose which language the model will use. I have a choice of English, Spanish, Turkish, and Japanese

Screen picture by Don Waktins CC by SA 4.0

Now that I have selected the ‘Knowledge’ I am going to use and the model I will use I am ready to use the ‘Session’ section of the menu and create a new session. I selected ‘New Session’ at the top and all my othe parameters are set correctly.

Screen pictire by Don Watkins CC by SA 4.0

At the bottom right of the ‘Session’ menu is a box for me to enter the prompt I am going to use.

Screen picture by Don Watkins CC by SA 4.0

You can see the output below that is easily accessible.

Screen picture by Don Watkins CC by SA 4.0

The output is separated into a code block and a Markdown block so that it is easy to copy the code into a code editor and the Markdown into an editor. Hollama has made working with Ollama much easier for me. Once again demonstrating the versatility and power of open source.

Neofetch: The Universal System Info Display Tool

Neofetch, hosted on the reputable and active project homepage at the Github repository, is designed to create system configuration screenshots on various platforms. The primary difference between Neofetch and ScreenFetch lies in its broader support; it extends beyond Fedora, RHEL, or CentOS and provides compatibility with almost 150 different operating systems, including lesser-known ones like Minix and AIX!

The Neofetch installation procedure is equally straightforward:

Debian and Ubuntu users use the following command:

$ sudo apt install neofetch

For Fedora and other RPM-based distributions use the following command:

$ sudo dnf install neofetch
Screen picture by Don Watkins CC by SA 4.0

You can also install neofetch on other operating systems including MacOS.

$ brew install neofetch
Screen picture by Don Watkins CC by SA 4.0

Once installed, Neofetch provides a standard system info display that can be further modified for your specific preference: image files, ASCII art, or even wallpaper, to name a few; all these customizations are stored in the .config/neofetch/ directory of the user’s home folder.

Discovering New Passions: Writing, Linux, and Sharing Open Source Stories

Our children gifted with a subscription to Storyworth for Father’s Day this year and each week a new writing prompt arrives in my email inbox. This week the prompt was what are some hobbies you have pursued or want to pursue in your retirement. It took me a while to think about that topic. I am not a guy to put together model planes and I don’t have a train set. I don’t play golf.

I walk, tinker with computers and write. I didn’t think of writing as a hobby until this week and maybe it’s not exaclty a hobby in the traditional sense but it’s a way for me to share my thoughts and journey with the wider world. I have been blogging frequently since early 2006 and have written over nineteen hundred articles for my own blog. In addition I have written hundreds of articles that have been published on a variety of sites including Both.org where I am a regular contributor. I also write for Allthingsopen.org and TechnicallyWeWrite.com.

I have created most of my content this year for Both.org, where we focus on Linux and open source. We are seeking individuals who would like to share their Linux and open source journey with our audience. Our website has been attracting more and more visitors. If you have an open source story to share, we encourage you to join us. Later this month, I’ll be traveling to Raleigh, NC to attend All Things Open. This will be my tenth ATO, and I am excited to learn from the people I will meet.

Write for us! We have a style sheet with guidelines and we’d love for you to share your open source journey with us.

Empowering Creators with Open Source Software

As we welcome another academic year, the integration of creative arts within school curriculums remains vital. Among open source resources that empower students to engage with digital soundscapes is Audacity, a free and versatile audio recording and editing software cherished by educators for its simplicity and power in the classroom setting. Audacity’s capacity has only grown, making it an indispensable tool not just today but as we look ahead to 2025 with ever-evolving educational needs:

Podcasting Platform of Choice: Connectivity through Sound
Teachers and students alike have adopted Audacity for crafting podcasts, serving an array of purposes from explaining classroom procedures directly within lessons to delivering language learning content. This interactive form has become a cornerstone in modern pedagogy by facilitating out-of-class communication that supplement the traditional teaching experience and offering students additional access points into course material through auditory means, which can enhance comprehension for many learners.

Language Acquisition with Audio Engagement: Learning Languages Through Listening
For language education, Audacity has been transformative by providing a platform where foreign language pupils record their spoken lessons and listen to them repeatedly—all within the safety net of open source software that champions accessibility for all students. This feature nurtures self-directed learning as well as peer interaction in multi-language classrooms, setting up an immersive auditory environment akin to real-world conversational scenarios.

Creative Expression Through Sound: Student Audio Projects Evolving with Time and Technology
Students’ love for sound extends beyond passive listening; they are creators in their own right using Audacity to produce unique audio projects such as bird songs, oceanic ambient tracks, or even creating custom narrations over chosen background music. This engagement stimulates imagination while providing a practical understanding of digital tools and copyright laws through exploring resources from Creative Commons and Wikimedia sound collections—a learning process that teaches respect for intellectual property alongside technical skills in audio manipulation.

Interviews as Interactive Learning: Engaging with Experts Through Sound Waves
Audacity allows students to conduct interviews, integrating them into their educational activities by adding layers of personal experience and expert insight directly through the auditory channel—a method that not only humanizes learning but also bridges generations within a classroom setting as older family members share experiences with younger ones. This formative approach promotes active listening skills while fostering familial bonds, an essential lesson beyond academics alone.

From Capture to Share: Effective Audio File Management for the Modern Classroom Stage and Beyond (2024 Edition)
Education today is not just about content but also delivery methodologies—therefore Audacity’s importance as a tool in helping students understand how different audio file formats serve various platforms. From .aup files that facilitate ongoing educational collaboration, to MP3 and WAV for final projects suitable for wider sharing via streaming web servers or digital portfolios, the software prepares young minds not only with technical skills but also industry standards they will encounter in professional spheres such as podcasting careers.

Open Source Software: A Lesson on Rights (2024 Update) and Legacy of Ubuntu’s Free Audio Education Toolkit
With its GNU GPLv2 license, Audacity is more than a mere software—it’s an educational journey itself with room for dialogue about copyright laws. This invites students into the world of intellectual property rights discussions that are increasingly relevant in our digital age and offers Linux users straightforward installation processes through standard repositories:

$ sudo apt-get install audacity
or with Fedora
$sudo dnf install audacity 

The software continues to stand its ground against the backdrop of continually developing technology with instructions provided for Mac OS X and Windows users ensuring no one is left behind in leveraging this educational powerhouse. Audacity is also available for Linux users as a Flatpak.

According to Wikipedia, “Audacity is the most popular download at FossHub,] with over 114.2 million downloads since March 2015.” Thus as we advance into 2025 and beyond, Audacity remains at the forefront of integrating creativity with digital sound technologies to enrich our classrooms while providing essential open source knowledge sharing that prepares students for a connected world where audio artistry goes hand-in-hand alongside academic excellence.

This article was adapted and rewritten using Ollama and the Phi3.5 model. Text was taken from an article originally published for Opensource.com in 2016.

Taking a look at financial data with Ollama

Several weeks ago a person asked me to assist her with organizing her financial records to take them to a tax professional. This person does not use a financial program like GnuCash which could make that project much easier. Instead we downloaded a csv file from her bank and then she used Microsoft Excel to add a category to each expense. This was a tedious process. I used a pivot table to further organize and display her data which she took to the tax preparer.

Recently while working on other projects with Ollama I wondered if it might be possible to use a local large language model to accomplish the same task. It is easy to download Ollama. If you are a LInux user like I am you can enter the following command in a terminal.

curl -fsSL https://ollama.com/install.sh | sh

I experimented with phi3.5 and Llama3.2 and found the latter to work better for me. It is easy to pull the model down to your computer with the following command:

$ ollama pull Llama3.2

Once the model was downloaded to my computer I wanted to make my own custom model to analyze my financial data set which was a csv file from the bank. I created a model file which I called financial using nano. Here is the text of the modelfile I created for this activity:

FROM llama3.2

# set the temperature to 1 [higher is more creative, lower is more coherent]

PARAMETER temperature .6

# set the system message

SYSTEM “””

You are a financial analyst. Analyze the financial information I supply.

“””

I used the model file to to create the custom model for this financial analysis. I set the temperature PARAMETER to .6 to make the work more accurate. I entered the following command in the terminal:

$ ollama create financial -f financial

This created the unique LLM based on Llama3.2 to perform the financial analysis. I made sure that the csv file from my financial institution was in the same directory as I was currently operating. This is important and then entered the following command to pull the csv file into the custom LLM.

ollama run financial:latest "$(cat data.csv)", Summarize my transactions. 

This gave me a complete summary of the debits and credits that were included in the small csv file. I have encountered some errors and I plan to keep working with the model and reading. I’m encoueraged by the results.

In search of the right GPU

I rely on my powerful Intel NUC with an i7 processor and 64 GB of RAM for my daily computing needs. However, it lacks a GPU, which makes it unsuitable for the experimentation I’ve been conducting with locally hosted large language models. To address this, I use an M2 MacBook Air, which has the necessary power for some of these tasks.

I had helped some local folks purchase a refurbished Dell computer from a refurbisher. They began to experience difficulty with it in a couple of months and when they did it was beyond the ninety day warranty. Rather than see them lose their money I wrote them a check for the original purchase price.

I believe that when you do good things that you will be rewarded in some fashion. I helped these folks purchase a new Dell Inspiron desktop which has a full factory warranty and when I was about to leave their home they asked me if I wanted to take the defective computer. I thought I might be able to fix it or use it for parts. I removed the cover and discovered that this Optiplex 5060 with an i5 CPU didn’t have a traditional hard drive like I had thought but instead was equipped with a Western Digital SN 270 NVME drive. I also discovered that the only thing wrong with the unit was a bad external power switch. Once I removed the front bezel I was easily able to power the device on.

Karma was working once again in my favor as I have found it does when you do for others as youu would have them do for you. I erased the Windows 11 install and installed Linux Mint 22 in it’s place. This unit also had two open low profile expansion slots and I wondered if I could find a graphics card with a GPU that would allow me to experiment with Ollama and other LLMs. I did some research and decided to purchase a XFX Speedster SWFT105 Radeon RX 6400 Gaming Graphics Card with 4GB from Amazon. The card came a couple days later and I installed it in one of the expansion slots.

After installing the card I placed the cover back on the machine, connected a spare Sceptre 27 inch display and an ethernet cable to it and downloaded Ollama and the Phi3 model. I downloaded and installed the ROCm modules which are helped Ollama to recognize the GPU. Ollama states that it recognizes the GPU when it finished installing the software. I think Ollama and the Phi3 module run faster with this unit. But maybe that’s wishful thinking. I also wanted to try Stable Diffusion on this computer and used Easy Diffusion which I have installed on the NUC before. I was frustrated to discover that my RX6400 card and GPU don’t work with EasyDiffusion. Am I missing something? Is there a fix?

I hope that if you’re reading this and you know of a fix for this issue that you would share it. I’d love to find and answer. Nonetheless, doing good for others always results in good coming back to you.