The power of LibreOffice

I have many documents created with Microsoft Office for assignments written for graduate school courses years ago. How can I easily convert those dozens of documents to a different format without using an online application? This is an excellent example of the power of open source.

Five years ago I took a course at a local university where all of the documents were provided in ‘docx’ format. Is there a way to convert those documents to an ‘odt’ format? There is and it is quite simple.

$libreoffice --headless --convert-to odt *.docx

What if I decided I wanted to convert those ‘docx’ items to ‘html’ so they could easily be shared on my classroom website. What if I had wanted to convert all those documents to html?

$libreoffice --headless --convert-to html *.docx

I can use the same tool to turn those ‘docx’ files into ‘pdf’ files with an iteration of the same command.

$libreoffice –headless –convert-to pdf *.docx

Using LibreOffice from the command line inside the directory where the files you want to convert is easy and the conversion is accomplished in a matter of seconds depending on your processor and memory. You can find many more uses of LibreOffice from the command line by entering the following command on your own command line if you have LibreOffice installed as most Linux distributions do.

$libreoffice --help

This is a great example of the power of open source software.

There is always a tool

Recently, a friend gave me a recent model of a Hewlett-Packard Pavilion laptop. He said, “It turns on but goes off almost immediately. Maybe you could use it?” I gladly accepted the gift and took it home, and it performed as he described. I got CMOS battery errors from the BIOS and decided to take the computer apart. Inspection revealed no separate CMOS battery, and subsequent internet searches revealed that this unit didn’t have a separate CMOS battery but instead relied on the main battery. The battery would not hold a charge and I decided to purchase a new one from an online retailer.

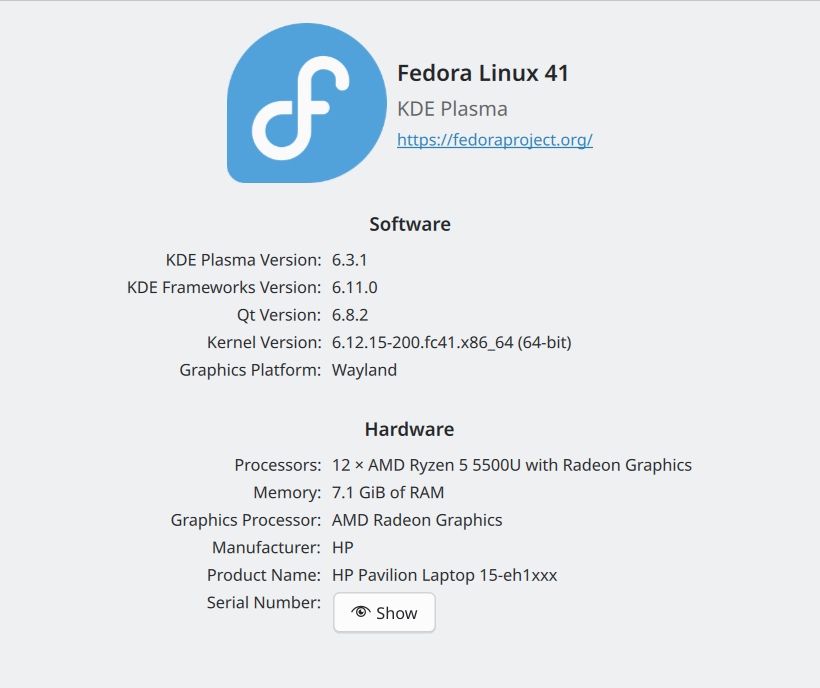
It took a couple of days for the new battery to arrive, and when it did, I removed the cover again and removed the old battery, installed the new one, replaced the cover, and started the laptop with a USB drive with Fedora 41 KDE Plasma. Pressing the ‘escape’ key on the keyboard got me to the BIOS menu, and I chose F9 to boot from USB. The unit has a six core AMD Ryzen 5 with 8 GB RAM, AMD Radeon graphics, and a 497 GB NVME drive. I started the Fedora installation process but was halted with an error message that stated, “Error occurred while activating your storage configuration – device is active.” I restarted the machine and tried again. It’s the same error message.

Internet searches of Fedora forums made me realize that the NVME drive was encrypted with Bitlocker and would not allow me to continue the installation until I could ‘decrypt’ the drive. What was I going to do? I tried to remove the encryption with GParted, Parted, and lost the ability to rebuild the drive with the Windows 11 restore partition. I briefly considered purchasing a replacement NVME drive for the unit. Further internet searches led me to consider using ShredOS. After researching several options, I devised an approach that suggested using the ‘dd‘ command. I used ‘lsblk‘, which lists block devices and solid state drives on a Linux system.

I booted the laptop with a live USB drive, opened a terminal, and issued the following command:

$ sudo dd if=/dev/uvrandom of=/dev/nvme0nX

Be sure to replace ‘X’ with the appropriate drive designation on your system. The process took 7021 seconds to complete, which is approximately two hours. When it was done, the decrypted partition was gone. I used the Fedora41 KDE-Plasma live drive and installed it without difficulty. I learned much from this experience and am grateful for all the excellent resources and tools available for Linux distributions.

Screen Picture by Don Watkins CC by SA 4.0

Essential Linux Commands

I started using Linux in late 1990’s when there were few books around that explained the basics. One of my favorite hand guides back then was the One Page Linux Manual. It had lists of many basic commands that I needed to navigate the files system. Here’s a list of some of the most basic commands than any new users needs to get started using Linux divided into useful categories. Happy learning!

Basic Commands:

  • pwd: Print the current working directory.
  • ls: List files and directories.
  • cd: Change directory.
  • mkdir: Create a new directory.
  • rmdir: Remove an empty directory.
  • rm: Remove files or directories.
  • cp: Copy files or directories.
  • mv: Move or rename files or directories.
  • touch: Create an empty file or update the timestamp of an existing file.
  • cat: Concatenate and display file contents.

File Permissions:

  • chmod: Change file permissions.
  • chown: Change file owner and group.
  • ls -l: List files with detailed information including permissions.

Process Management:

  • ps: Display information about active processes.
  • top: Display real-time system usage and processes.
  • kill: Terminate a process

System Information:

  • uname: Print system information.
  • df -h: Display disk space usage.
  • free -m: Display memory usage.
  • uptime: Display system uptime.

Networking:

  • ifconfig: Configure network interfaces.
  • ping: Send ICMP echo requests to test connectivity.
  • netstat: Display network connections, routing tables, and more.
  • ssh: Securely connect to a remote system.

Text Editing:

  • nano: Simple text editor.
  • gedit: Text editor for the Gnome environment
  • less: View file contents one page at a time.
  • grep: Search files for a text pattern.

Compression and Archiving:

  • tar: Archive files.
  • gzip: Compress files.
  • bzip2: Compress files with better compression.
  • unzip: Extract compressed files.

Package Management:

  • apt: Manage packages on Debian-based systems.
  • dnf: Package manager for Fedora.

This cheat sheet covers the most commonly used commands to help you get started with Linux.

DIY Bootable Linux Disk Creation Without Internet Access or Additional Tools

I keep a bootable Linux disk with me most of the time because I never know when I am going to need to use one to rescue a crashed Microsoft Windows machine or turn someone on to the Linux desktop. Most distributions include my own daily driver Linux Mint Cinnamon have utilities that make boot disk creation much easier than it used to be. If you are on a Windows or MacOS platform you could use a great utility like Etcher.io which is one of my favorite boot disk creation tools. But let’s suppose that you are using a Linux computer with no connection to the internet and no other disk creation tools.

You could use dd which is tool that many folks have never used but it’s still a reliable utility and one that can make a bootable disk when all else fails. The dd command is a Linux utility that is sometimes referred to as ‘disk destroyer’ or ‘data duplicator and it is very useful and effective if you have no other way to create a bootable USB drive.

You will need a FAT32 formatted USB drive. Then you will need to determine the directory in which the iso file bearing the Linux distribution resides so that you can point to it in your command sequence. You will also need to use the lsblk command to determine which block device you are going to send your data to. Use of the dd command without good information can be devastating to the health of your system as it is easy to overwrite the wrong drive like your boot and/or data drive.

With your USB stick inserted into your computer open a terminal issue the following command:

$ lsblk 

You should receive an output that looks something like this.

$ /dev/sdb1 or /dev/sdc1

Unmount the drive with the following command.

$ sudo umount /dev/sdX1 

 Use the dd command to write the ISO file to the USB drive:

$ sudo dd if=/path/to/linux.iso of=/dev/sdX bs=4M status=progress

Replace /path/to/linux.iso with the path to your ISO file and /dev/sdX with the correct device identifier

After the dd command completes, you can verify that the data was written correctly by chechecking the output of lsblk or fdisk -1.

Once the process is complete, safely eject the USB drive:

$ sudo eject /dev/sdX

Now you are ready to start using your newly created Linux boot drive to rescue Windows systems or turn somene on to using Linux.