Nextcloud with a snap

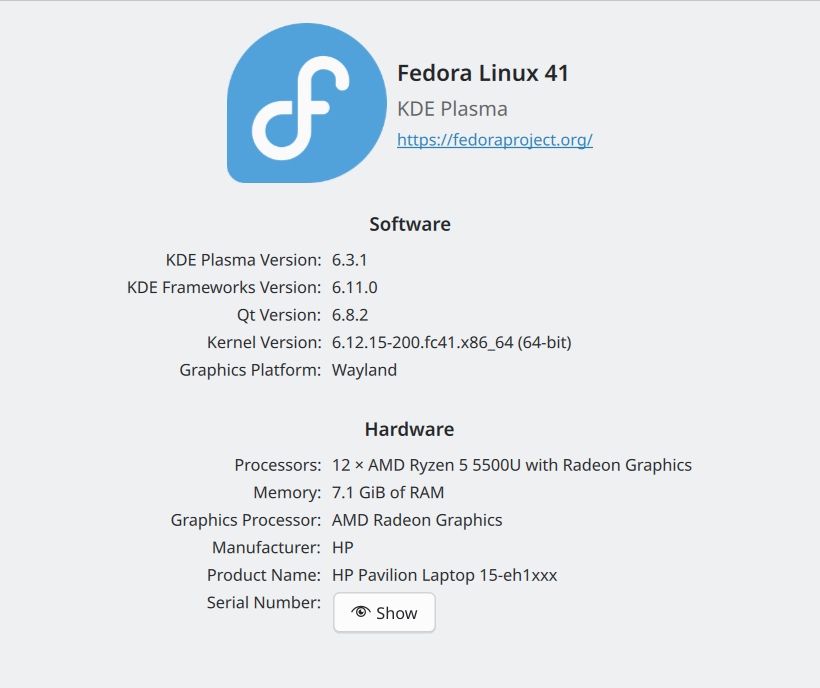
Recently I have been tasked with assisting a local medical office with finding a new way to securely store medical images. The office needed a robust replacement for an aging Windows computer that was soon to be out of date. I considered a number of solutions among them TrueNAS, OwnCloud, Nextcloud and a Samba share. Nextcloud seemed to fit the bill but how to deploy it became a concern. I downloaded a Nextcloud iso file from Turnkey Linux and built a server with VirtualBox. I considered a Docker implementation and then I discovered what proved to be the easiest which was a snap installation on Fedora KDE Plasma. This proved to be the easiest.

First I had to install snap on Fedora KDE Plasma 42:

$ sudo dnf install snapd

Install the Nextcloud snap package:

$ sudo snap install nextcloud

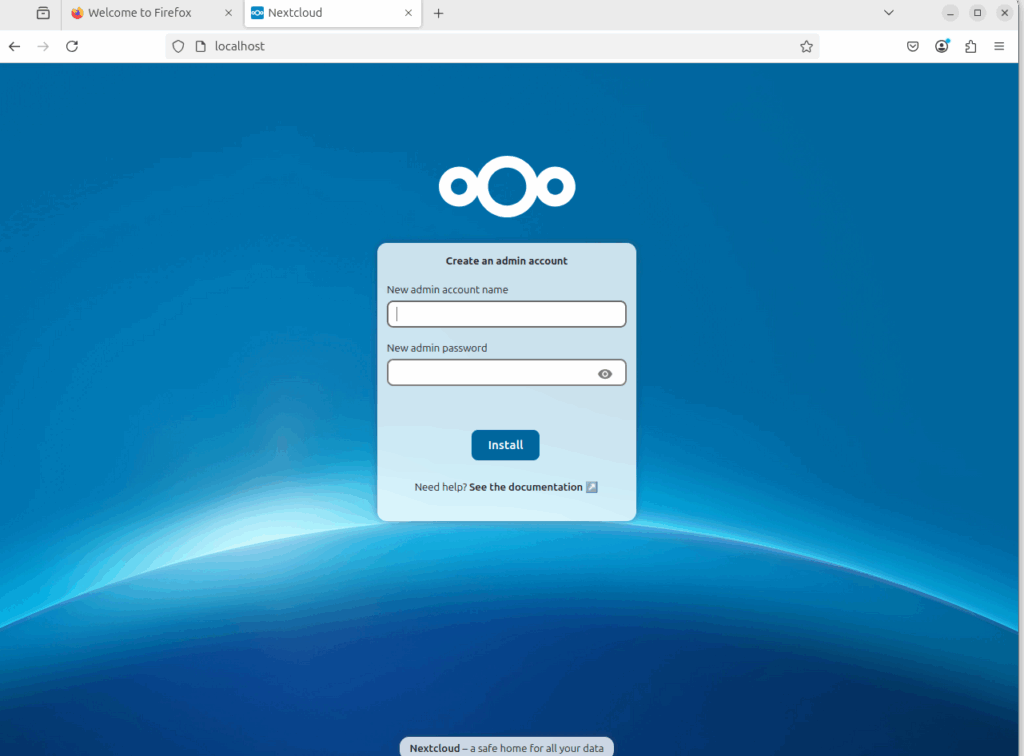
Now that snap is installed i opened a browser and pointed. Logout and log back in to make sure log out and back in again, or restart your system, to ensure snap’s paths are updated correctly. Once that is accomplished point your browser at http://localhost and login. Enter your own admin user and password and click on ‘Install.’

Screen picture by Don Watkins CC by SA 4.0

When the installation was complete was taken the next display appeared so that I could accept the default applications.

Screen picture by Don Watkins CC by SA 4.0

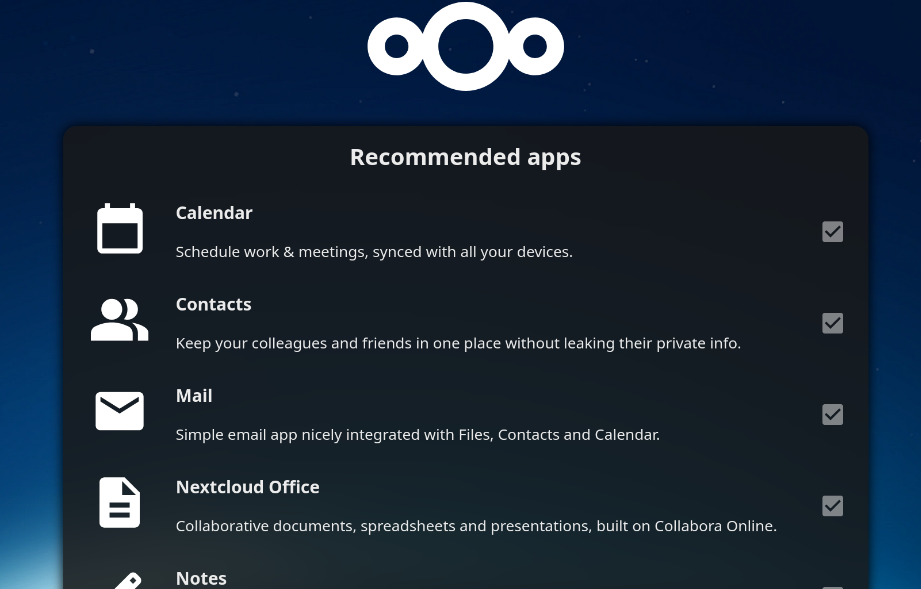
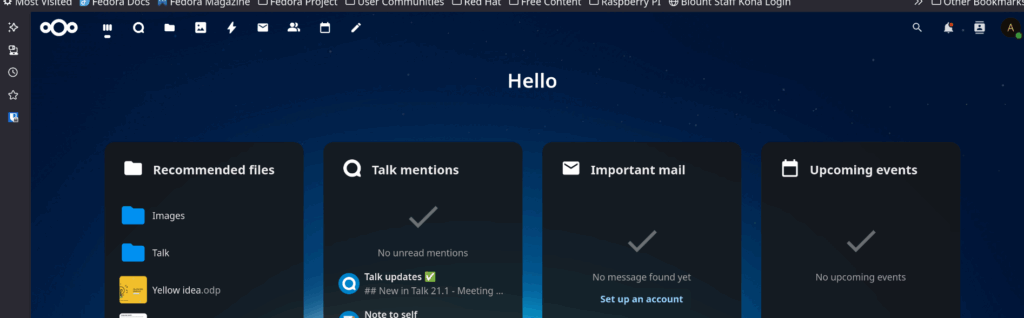
Once the recommended applications are downloaded and setup my new Nextcloud installation is ready to use.

Screen picture by Don Watkins CC by SA 4.0

The default install is for ‘localhost’ which is fine for the local user but I wanted to configure this Nextcloud install for use by other computers on the local area network which means changing the config.php to the ipaddress of the local machine. I was familiar with that process from previous installs using the Turnkey Linux iso file but how was that different with the snap installation.

I did some research and fortunately for all of us there is a Github repository with all the answers. Open a terminal and enter the following command to change the hostname to the ipaddress or hostname where your Nextcloud installation will reside.

$ sudo nextcloud.occ config:system:set overwritehost --value="youripaddress"

This snap installation of Nextcloud is open source with a GPL v. 3.0 license. The project has excellent documentation. Be sure to open port 80 on your firewall to ensure that the other devices on your network can access the Nextcloud application. This snappy Nextcloud includes Nextcloud 31, Apache 2.4. PHP 8.3, MySQL 8.0 and Redis 7.2. For more information be sure to consult the project wiki.

My installation was on Fedora but the the snap installation is available for other distributions including Arch, Ubuntu, RHEL, Ubuntu, Debian, openSuse, Centos and more. Be sure to open the necessary ports on your firewall to ensure that others on your LAN have access to your Nextcloud server.

Cronopete: A Time Machine like backup for Linux

There are lots of ways to backup Linux. One of them is using the ‘tar’ command which was the first method I used many years ago when I was a Linux newbie. Later I used ‘rsync’ to backup a mail server that was running on RHEL 2.1. Linux is like a Swiss Army knife when it comes to bacup options. I’m no longer backing up file servers. These days I’m backing up my workstation or the laptop I used to write most of the articles I write. I had been using DejaDup when a fellow blogger suggested I try Cronopete. He said it was a lot like Time Machine on macOS. Having used Time Machine in the past I was familiar with the interface and the general idea.

Cronopete is one of the gems of the open source world and I’ve often wished that it were available for more than Linux. The current version is 4.19.0 and the easiest way to get it is to go to the Rastersoft website and download it for your Linux distribution. The project provides packages for ‘rpm’ and ‘deb’ based systems. You can choose to build it from source if you need a different solution. I downloaded the ‘rpm’ package for Fedora because that’s what I needed. Once the package is in my download folder I double click and it’s ready to install.

Screen picture by Don Watkins CC by SA 4.0

After the software is installed the program creates a shortcut on the task bar at the lower right of the display.

Screen picture by Don Watkins CC by SA 4.0

Click on that icon and you have the option to ‘Configure the backups’. Immediately an intuitive graphic appears that’s very easy to configure options for your particular backup needs.

Screen picture by Don Watkins CC by SA 4.0

At the top right of the configuration panel you are given the option to store the backups in a local folder or in an external drive. I have a one terabyted external drive for my workstation and a smaller thumb drive for the laptop. In the middle of the configuration panel there is an option to change the backup destination. Next to that is a button to choose what folders to backup. The program defaults to ‘/home/user’. Cronopete is not designed to backup an entire computer along with configuration files like Timeshift on Linux Mint. Be sure to ‘Enable backups’ at the lower left of the configuration panel.

According to the project, “As a backup utility, it makes periodically a copy of all the user files in a separate hard disk, thus allowing to recover them in case of accidentally deleting a file, or if the main hard disk gets damaged. Each copy is stored separately (one copy per hour is kept for the last 24 hours, one daily copy for the last 15 days, and one weekly copy for the rest), which means that the user can choose which copy to restore. Files that do not change between backups are stored as hard links, and thus each new copy uses much less disk space than a true full copy. Internally, it uses RSync to do all the backup work.”

Configure what you are going to backup is the next process and the interval for those backups if desired. There are advanced options which include backing up hidden files and folders and extended attributes.

Screen picture by Don Watkins CC by SA 4.0

Once the configuration is complete I am ready to perform the backup. I am going to choose the first option to ‘Back Up Now.’ If this is your first backup Cronopete will provide you with the option of formatting the backup drive.

Screen picture by Don Watkins CC by SA 4.0

If your drive is already formated choose ‘Mount and Open’ and now you are ready to begin your first backup. When the home directory is backing up the ‘anaCronopete’ icon on the task bar will appear green. When the process is complete it will return to a gray color.

Screen picture by Don Watkins CC by SA 4.0

After backing up the files you can open your file manager and you will find a folder marked ‘cronopete.’ Opening that folder you will find subfolders each date and time stamped for the backup that occurred.

Screen picture by Don Watkins CC by SA 4.0

Restoring from backup is just as easy. Return to the ‘Cronopete’ icon on the taskbar at the lower right of the display and choose ‘Restore files.’ You will be presented with a graphic of your backed up files each with a time stamp of when the backup occurred. Use the two blue arrows at the top right to find the particular backup time and either select all or select the folder and/or the file you want to restore. Highlight the file or folder and click on ‘Restore files’ at the top left of the display.

Cronopete is open source with a GPL v 3.0 license.

Finding the Perfect Linux-Compatible Computer

Let’s suppose you want to get into the Linux thing and you want to do it with a new computer. You could buy a Linux laptop or desktop from a number of different vendors including System76, Tuxedo, Dell, Lenovo and others. What if you come across a computer in a technology store how do you determine if it’s going to work with your favorite Linux distribution. You check the Hardware for Linux database or you could check with Ubuntu Certified where folks have already done the homework for you. Fedora maintains another list of certified hardware.

Today I was shopping at a prominent technology store and spotted a Dell Inspiron 3530 that was just what I was looking for and at a price I was willing to pay but I wanted to make sure that it would work with Linux so I did a quick internet search and Ubuntu Certified supplied the answer to my question. I brought this sleek new laptop home and using a Live USB with Fedora 42 KDE Plasma and quickly determined that the hardware was going to work. These databases are a great way to help users determine the likelihood that there new or used computer would be a suitable candidate for Linux.

I had Cronopete installed on the laptop I was replacing so I did a quick backup of all my files and then installed Cronopete on the new laptop. Cronopete easily restored the files and quickly I was ready to begin writing this article.

This laptop is modest but adequate and I fell in love with it as soon as I started using it. The unit has a touch screen and it works well. It is going to be more than adequate for my needs and I am grateful that I found it. Here’s a snapshot of the system using

$ inxi -b
 Host: fedora Kernel: 6.14.9-300.fc42.x86_64 arch: x86_64 bits: 64
  Desktop: KDE Plasma v: 6.3.5 Distro: Fedora Linux 42 (KDE Plasma Desktop
    Edition)
Machine:
  Type: Laptop System: Dell product: Inspiron 15 3530 v: N/A
    serial: <superuser required>
  Mobo: Dell model: 0VPMKH v: A00 serial: <superuser required> UEFI: Dell
    v: 1.15.0 date: 09/06/2024
Battery:
  ID-1: BAT0 charge: 38.9 Wh (96.3%) condition: 40.4/40.0 Wh (101.0%)
CPU:
  Info: 10-core (2-mt/8-st) 13th Gen Intel Core i5-1334U [MST AMCP]
    speed (MHz): avg: 669 min/max: 400/4600:3400
Graphics:
  Device-1: Intel Raptor Lake-P [UHD Graphics] driver: i915 v: kernel
  Device-2: Sunplus Innovation Integrated_Webcam_HD driver: uvcvideo
    type: USB
  Display: wayland server: Xwayland v: 24.1.6 compositor: kwin_wayland
    driver: gpu: i915 resolution: 1920x1080~60Hz
  API: OpenGL v: 4.6 compat-v: 4.5 vendor: intel mesa v: 25.0.7
    renderer: Mesa Intel Graphics (RPL-U)
  Info: Tools: api: clinfo, eglinfo, glxinfo, vulkaninfo
    de: kscreen-console,kscreen-doctor wl: wayland-info x11: xdriinfo,
    xdpyinfo, xprop, xrandr
Network:
  Device-1: Realtek RTL8852BE PCIe 802.11ax Wireless Network
    driver: rtw89_8852be
Drives:
  Local Storage: total: 476.94 GiB used: 7.91 GiB (1.7%)
Info:
  Memory: total: 8 GiB note: est. available: 7.44 GiB used: 3.35 GiB (45.0%)
  Processes: 349 Uptime: 18m Shell: Bash inxi: 3.3.38

Switching to Linux can be an exciting journey, and having a computer that seamlessly supports your favorite distribution makes all the difference. With resources like Ubuntu Certified and Fedora’s compatibility database, finding Linux-ready hardware has never been easier. My new Dell Inspiron 3530 may be modest, but it’s exactly what I needed—reliable, responsive, and ready to power my workflow. Thanks to Cronopete, setting up was effortless, allowing me to jump right into writing. If you’re considering making the switch, remember that a little research upfront can ensure a smooth transition into the world of Linux. Happy computing!

How KDE Plasma Can Save Your PC from Obsolescence

October 14, 2025, is a big day if you’re a Microsoft Windows user. That’s the day that support for Windows 10 ends. But what if you’re happy with the computer you have now and don’t feel like spending more money to stay with the guys from Redmond? Is there a choice for you? You bet. The KDE Community has precisely what you need. It’s KDE for Windows 10 Exiles. You now have a choice, and all you need to do is upgrade your operating system.

That might seem like a tall order to someone who has never done that sort of thing but it’s not that difficult. The KDE Project has a website dedicated to helping you do precisely that. KDE recommends trying the Plasma desktop. You’ll be glad you did too. That means you get to keep the computer you already have, and it means that from here on out, you’ll be in the driver’s seat, along with the rest of us, using free and open-source software. KDE’s Plasma desktop ensures that “you get all the advantages of the safety, stability, and hi-tech of Linux, with all the features of a beautiful, modern, and powerful graphic environment.”

There are several good reasons to choose Plasma, and one of them is that it’s easy. The Plasma desktop doesn’t look that different from the one you have been using. The launch menu is in the bottom left-hand corner, just like it is on Windows 10. Plasma is powerful and lets you move things around so that your workflow could be precisely what you need it to be. The best thing about Plasma is that it’s free. It can be on your computer or everyone in your department could upgrade to Plasma for free. Plasma is powerful. You’ll discover that Plasma lets you have up to four desktops. You’re no longer constrained to just one.

Organizing your files and folders requires some planning, but it’s an easy task. Get a USB-compatible external hard drive and store all the data you want to keep on it. Later, Plasma will have no trouble reading it. Most of the hardware you’ll use, whether it’s WiFi or Bluetooth, will be configured by the operating system. If you’re a Microsoft Office user, your documents can be read by LibreOffice, which is included in most standard Linux distributions.

Moving to Linux means that you’ll be giving up viruses and virus-related scams. You won’t be getting any advertisements from the folks in Redmond. There won’t be telemetry built into your operating system and its software. You will begin to enjoy absolute privacy, and you won’t be forced to upgrade. Your computer will last much longer. There are no hidden costs with Linux.

I am a long-time Linux user, but I’ve recently converted to KDE Plasma on Fedora 42. Many Linux distributions feature the Plasma desktop. There are many other desktop options for Linux, so if you don’t care for Plasma, be sure to check these other desktop environments: Gnome, XFCE, MATE, Cinnamon, and LXQT. Use this do-it-yourself guide from the End of 10 website to guide your upgrade.

Solving the touchpad problem

In the last blog post I wrote about the new Lenovo V 15 laptop I purchased and installed Fedora KDE Plasma 42. One of the annoying problems I have had in the last day since setting this laptop up is the lack of access to a right button click using just the touchpad. I had resigned myself to just using the wireless Logitech mouse but it still dogged me that I couldn’t figure out the problem.

One of the best things about the KDE Plasma desktop is the incredible granularity of the controls that a user has to customize the desktop for each person. I did some searching in Fedora forums and on Reddit, then I went back to the ‘System Settings’, which are myriad. The solution was right before me, but I had not seen it. Navigate to the lower left of the Fedora KDE Desktop display and the first icon on the panel is ‘System Settings’ indicated by the red arrow below.

Screen picture by Don Watkins CC by SA 4.0

Click on the ‘System Settings’ which opens the following menu option. Select the ‘Mouse and Touchpad’ option.

Screen picture by Don Watkins CC by SA 4.0

Then select the ‘Touchpad’ option. The’ Integrated right click’ option is at the bottom right of the menu. Be sure to select the second option, which allows you to click anywhere on the touchpad with two fingers to create the same effect as a right click with the mouse.

Screen picture by Don Watkins CC by SA 4.0

Problem solved! Thank you KDE Plasma desktop and the Fedora team.

Lenovo V15 & Linux: A Perfect Match? My Fedora KDE Plasma Experience

I’ve been looking for a new laptop for a couple of months because the one I’ve been using is missing a ‘P’ key. Replacing the key turned out to be more work than I was interested in pursuing, so I had to decide what I would do to replace the unit. Recently, I was helping a friend transition from her old laptop to a new one she had purchased at a local store, and that store invited me to consider a Lenovo V 15 with a Ryzen 7 CPU, 16 GB RAM, and a 512 GB NVMe drive. The price was right, but I wasn’t sure whether this unit would work with Linux. I have been using Fedora KDE Plasma since January and wanted to continue using it. Still, there was very little information in any place I searched on the internet about whether this version 15 would work with Linux.

I decided to proceed with the purchase, and today, I am glad to report that the unit works quite well with Fedora. I’m pretty sure you might be interested in installing almost any other Linux distribution on it. This is my first ever Lenovo. I purchased from BJs.com . It came from Lenovo with Windows 11 Home, but that OS was never allowed to boot. I installed Fedora 42 KDE Plasma from a USB drive and am now getting used to it.

I installed ‘inxi’ so that you could look at the internals of this new system.

System:
    Kernel: 6.14.5-300.fc42.x86_64 arch: x86_64 bits: 64
  Desktop: KDE Plasma v: 6.3.5 Distro: Fedora Linux 42 (KDE Plasma Desktop
    Edition)
Machine:
  Type: Laptop System: LENOVO product: 82YY v: Lenovo V15 G4 ABP
    serial: <superuser required>
  Mobo: LENOVO model: LNVNB161216 v: SDK0T76463WIN
    serial: <superuser required> UEFI: LENOVO v: MSCN17WW date: 08/08/2024
Battery:
  ID-1: BAT0 charge: 25.5 Wh (65.4%) condition: 39.0/38.0 Wh (102.5%)
    volts: 7.9 min: 7.7
CPU:
  Info: 8-core AMD Ryzen 7 7730U with Radeon Graphics [MT MCP] speed (MHz):
    avg: 1397 min/max: 400/4547
Graphics:
  Device-1: Advanced Micro Devices [AMD/ATI] Barcelo driver: amdgpu v: kernel
  Device-2: Bison Integrated Camera driver: uvcvideo type: USB
  Display: wayland server: Xwayland v: 24.1.6 compositor: kwin_wayland
    driver: gpu: amdgpu resolution: 1920x1080~60Hz
  API: OpenGL v: 4.6 compat-v: 4.5 vendor: amd mesa v: 25.0.4 renderer: AMD
    Radeon Graphics (radeonsi renoir ACO DRM 3.61 6.14.5-300.fc42.x86_64)
  Info: Tools: api: clinfo, eglinfo, glxinfo, vulkaninfo
    de: kscreen-console,kscreen-doctor wl: wayland-info x11: xdriinfo,
    xdpyinfo, xprop, xrandr
Network:
  Device-1: Realtek RTL8111/8168/8211/8411 PCI Express Gigabit Ethernet
    driver: r8169
  Device-2: Realtek RTL8852BE PCIe 802.11ax Wireless Network
    driver: rtw89_8852be
Drives:
  Local Storage: total: 476.94 GiB used: 6.07 GiB (1.3%)
Info:
  Memory: total: 16 GiB note: est. available: 13.48 GiB used: 3.88 GiB (28.8%)
  Processes: 371 Uptime: 1h 21m Shell: Bash inxi: 3.3.38

It is replacing a Dell Latitude 5410. The keyboard seems light but easy to use, and the ‘P’ key works. The unit is relatively light, and the case is plastic. The display is more than adequate. I’m getting used to it. I use an external Logitech M325 wireless mouse, so I don’t typically use the touchpad. The touch pad is adequate but not impressive. Maybe I’ll discover how to fine-tune that. I’m very impressed with the Realtek wireless. I like the fact that it’s got an Ethernet port on it, too. Sometimes I’m called on to troubleshoot connections where that is useful. It has two USB-A ports, one USB-C port, an HDMI port, and a headphone port. The weight is listed at 3.64 pounds but seems lighter. I’m happy with it and wanted to share this with folks like me that were looking for new laptop that they could enjoy using Linux on.

From Snap to Share: Why KDE Spectacle is a Must-Have Tool

Writing blog posts that share my experiences with Linux and open-source software often requires screenshots of accomplishing a task or an expected outcome. Over time, I have used a number of such programs in Windows, macOS, and Linux. Most recently, using Fedora 42 KDE Plasma has introduced me to Spectacle. It can capture images of the entire desktop, a single monitor, the currently active window, the window under the mouse, or a specific rectangular area of the screen. Spectacle is open source with a GPL v2 license. It has been developed under the KDE umbrella. The source code is freely available. The project provides adequate documentation and a forum where help is readily available.

Screen picture by Don Watkins CC by SA 4.0

Spectacle offers all the tools I need to work successfully and effortlessly. It features an intuitive interface and outstanding tools that make it easy to capture images and annotate them for all of my writing projects.

Spectacle image captures default to ‘png’ but can be saved in several formats, including JPEG, AVIF, TIFF, Windows BMP, and others. The screen images can be directly exported to other installed applications on your system.

Screen picture by Don Watkins CC by SA 4.0

Spectacle provides an excellent configuration menu panel that easily allows users to configure the program for their optimum use.

Screen picture by Don Watkins CC by SA 4.0

Spectacle provides excellent documentation with a handbook under the ‘Help’ menu in the application.

Screen picture by Don Watkins CC by SA 4.0

In conclusion, KDE Spectacle is a robust and versatile tool for capturing screenshots in Linux environments, embodying the spirit of open-source collaboration. Its seamless functionality and adaptability make it an invaluable asset for anyone who frequently documents their experiences or workflows with Linux and KDE Plasma. Whether you’re a seasoned Linux user or just beginning your journey, Spectacle is undoubtedly worth incorporating into your toolkit.

There is always a tool

Recently, a friend gave me a recent model of a Hewlett-Packard Pavilion laptop. He said, “It turns on but goes off almost immediately. Maybe you could use it?” I gladly accepted the gift and took it home, and it performed as he described. I got CMOS battery errors from the BIOS and decided to take the computer apart. Inspection revealed no separate CMOS battery, and subsequent internet searches revealed that this unit didn’t have a separate CMOS battery but instead relied on the main battery. The battery would not hold a charge and I decided to purchase a new one from an online retailer.

It took a couple of days for the new battery to arrive, and when it did, I removed the cover again and removed the old battery, installed the new one, replaced the cover, and started the laptop with a USB drive with Fedora 41 KDE Plasma. Pressing the ‘escape’ key on the keyboard got me to the BIOS menu, and I chose F9 to boot from USB. The unit has a six core AMD Ryzen 5 with 8 GB RAM, AMD Radeon graphics, and a 497 GB NVME drive. I started the Fedora installation process but was halted with an error message that stated, “Error occurred while activating your storage configuration – device is active.” I restarted the machine and tried again. It’s the same error message.

Internet searches of Fedora forums made me realize that the NVME drive was encrypted with Bitlocker and would not allow me to continue the installation until I could ‘decrypt’ the drive. What was I going to do? I tried to remove the encryption with GParted, Parted, and lost the ability to rebuild the drive with the Windows 11 restore partition. I briefly considered purchasing a replacement NVME drive for the unit. Further internet searches led me to consider using ShredOS. After researching several options, I devised an approach that suggested using the ‘dd‘ command. I used ‘lsblk‘, which lists block devices and solid state drives on a Linux system.

I booted the laptop with a live USB drive, opened a terminal, and issued the following command:

$ sudo dd if=/dev/uvrandom of=/dev/nvme0nX

Be sure to replace ‘X’ with the appropriate drive designation on your system. The process took 7021 seconds to complete, which is approximately two hours. When it was done, the decrypted partition was gone. I used the Fedora41 KDE-Plasma live drive and installed it without difficulty. I learned much from this experience and am grateful for all the excellent resources and tools available for Linux distributions.

Screen Picture by Don Watkins CC by SA 4.0

Unlocking the power of Linux

My initial reaction to Linux was that I did not fully understand its range of tools. At that time, I was the technology director for a small K-12 public school district with limited resources but a growing number of classrooms, learning labs, and administrative offices. I came from a social science background, and although I was willing to learn, I was acutely aware of how little I knew. It did not take too long to understand what powerful tools enabled me to discover our network and learn the intricacies of TCP/IP.

Here’s a list of ten tools that became a significant part of my repertoire. I used them to teach others about network computing and the power of Linux.

The ping command is one of the most frequently used by sysadmins. It utilizes ICMP packets to verify whether two machines are connected.

$ ping 192.168.86.1

I learned that I could also ping a domain.

$ ping donwatkins.info

The traceroute command displays the route from your current machine to the remote server/system, showing each hop along the way.

$ traceroute donwatkins.info

Traceroute can identify the network path, detect latency, locate network issues, and visualize network topology. Here is the result of the traceroute command:

1   192.168.1.1  1.114ms  0.234ms  0.125ms 
2   67.252.48.1  21.260ms  12.357ms  20.123ms 
3   24.58.217.101  29.425ms  32.921ms  32.608ms 
4   24.58.38.176  10.866ms  11.450ms  10.017ms 
5   24.58.32.62  25.848ms  25.377ms  15.594ms 
6   66.109.6.2  24.275ms  *  30.399ms 

The mtr command is a combination of ping and traceroute. It is used to track for packet loss. MTR is a versatile and dynamic tool that provides sysadmins with valuable insights into network performance and helps them identify and resolve issues efficiently.

$ mtr donwatkins.info

You can use the ifconfig tool to find your IP address. It provides TCP/IP information for all your network addresses, including the loopback address.

$ ifconfig 

The netstat (network statistics) command-line tool provides detailed information about network connections, routing tables, interface statistics, masquerade connections, and multicast memberships on a system. If you want to see all the network activity on your system, consider using the following command.

$ netstat -a

If you are looking for DNS information, dig is the tool you should use. It is a flexible tool for interrogating DNS name servers. It performs DNS lookups and displays the answers returned from the name server(s) that were queried.

$ dig donwatkins.info

One of my favorite tools for discovering what traffic is coming across my network is tcpdump. It is a powerful command-line packet analyzer used for network traffic monitoring and analysis. It captures and displays the packets being transmitted or received over your network. You need administrative privileges to run the command.

$ sudo tcdump 

The whois command queries databases that store registered domain names and related information. This command is useful if you need information about a specific domain, such as its registrar.

$ whois donwatkins.info

If you are looking for a powerful and versatile tool for network discovery and security auditing, then Nmap is for you. It can discover devices on a network, identify their IP addresses, and collect information about them, creating a detailed network inventory. Be sure to check the Nmap project website for excellent documentation on its use. I use nmap to scan my router to check for open ports.

$ nmap 192.168.1.1

One of my favorite network monitoring tools is ntopng. It is a web-based application for monitoring network traffic released under the GPLv3 licenseNtopng is the modern version of the original tool, ntop, created by Luca Deri in 1998. It has been significantly improved in performance, usability, and features.

I am a graphical learner, and Etherape helped me visualize TCP/IP traffic across our network. Etherape is easy to install on either .deb or .rpm based systems.

$ sudo apt install etherape
or 
$ sudo dnf install etherape

Only an administrator can run Etherape, so you must add sudo to your command when executing it.

$ sudo etherape

Be sure to consult the documentation and Linux manual pages for all these commands to explore all the different options open to you as a Linux system administrator.

An Introduction to Krita: A Powerful Tool for Digital Artists

Welcome to the exciting world of digital art! Whether you are an experienced artist or a curious beginner, Krita is a name you should know. Developed by the KDE community, Krita is free and open-source digital painting software that has gained immense popularity in art. It has powerful features and is easy to use, with a user-friendly interface and extensive customization options.

What is Krita?

Krita is digital painting software designed for artists of all skill levels. Although I wouldn’t consider myself a well-known digital artist, Krita allows me to easily create high-quality graphics for my presentations. It is available for download and installation on Windows, MacOS, and Linux.

Key Features

Customizable brushes: One of Krita’s standout features is its extensive collection of brushes. With over 100 preloaded brushes and the ability to customize and create your own, you have endless possibilities.
Layers and masks: Krita features a powerful layer system that enables non-destructive editing, allowing artists to experiment and refine their artwork easily. Additionally, masks let you apply effects or adjustments to specific areas without changing the original layer. This level of flexibility is a significant advantage for artists who enjoy fine-tuning their work.
Intuitive Interface: Krita’s user interface is designed with artists in mind. It’s clean, intuitive, and highly customizable. You can arrange your workspace to suit your preferences, ensuring all your essential tools are within easy reach.
Advanced color management: Krita offers a variety of color spaces and profiles for artists who need precise color accuracy. Whether you’re working on a project for print or digital display, Krita’s advanced color management tools ensure your colors appear exactly as intended.
Animation capabilities: Krita provides animation features along with its powerful painting tools. Users can create traditional hand-drawn animations utilizing the timeline and onion-skinning tools.

Screen picture by Don Watkins CC by SA 4.0

Community and Resources

One of Krita’s best aspects is its vibrant and supportive community and excellent documentation. Numerous tutorials, forums, and resources are available to help you get started and enhance your skills. The Krita website is a valuable source of information, providing user guides, tutorials, and galleries that showcase stunning artwork created with Krita.