Reviving a ‘Dead’ Laptop: A Linux Mint Success Story at the Local Library

An urgent plea for assistance reached me from our local library director concerning a patron grappling with an unresponsive Dell laptop. Upon arriving at the library, I encountered the early-morning visitor facing this issue. Activating the laptop, it became evident that it refused to boot, displaying no prompts to access the startup disk via F1 or F2. I proceeded to explain to the individual that their hard drive was likely damaged or that crucial startup files had been lost, particularly given the laptop’s eleven-year history.

I arrived equipped with my own Linux laptop and a bootable USB drive containing Linux Mint 21.2 Cinnamon. Placing the USB drive into the ailing laptop, I powered it on and initiated the startup using the Dell Laptop’s standard F12 key for USB boot selection. The process proved successful, allowing me to test run Linux Mint. After connecting to the wireless network, which was promptly recognized, I investigated the mounted hard disk, revealing the absence of vital startup files. I took the time to illustrate to the individual that their computer was indeed functional, but the Windows 10 operating system was malfunctioning.

Inquiring about any valuable data stored on the laptop, the patron confirmed there was none. With their consent to explore Linux Mint, I initiated the installation process. The laptop’s BIOS hailed from 2012, armed with 4 gigabytes of RAM and an Intel i3 processor—not a powerhouse by any means, and possibly not the ideal candidate for Linux Mint Cinnamon. Although Xfce might have been more suitable, it wasn’t an available option. Despite the gradual pace, the installation was eventually complete, resulting in a fresh instance of Linux Mint Cinnamon 21.2.

The laptop owner Gary expressed his enthusiasm as this seemingly ‘defunct’ device was revitalized. I invested time in updating the system and guiding him through installing desired software like Google Chrome. I offered instructions on startup, shutdown, login procedures, and wireless connectivity for when he returned home. Additionally, I assisted him in configuring LibreOffice Writer, allowing him to save files in ‘.docx’ format for sharing with his friends.

Once my assistance concluded, I returned the laptop to Gary, who inquired about compensation. I informed him that, as a library volunteer, my aid and installation services were free, suggesting he pay the kindness forward to someone else. Grateful, he remarked that my help had spared him $170—the amount he had spent on the refurbished computer. I believe that Linux and open-source contributions are imbued with positive karma and that introducing yet another individual to the merits of free software will ultimately bring forth something positive.

Customize an Intel NUC 11

In the previous year, I acquired a Hewlett-Packard DevOne to replace an Intel NUC 10, which had been serving as my primary workstation. I set up the DevOne with a docking solution detailed in an article I wrote last year, aiming to replace both the NUC and an older Darter Pro I had been using. However, I gradually realized that the DevOne wasn’t quite suitable for me due to its smaller fourteen-inch screen. Given my aging eyes, I needed to adjust accessibility settings, which work better with larger displays.

I must acknowledge that the DevOne is an impressive laptop—crafted with quality and firm performance. Nevertheless, the idea of docking a computer that I never use in a laptop mode started to seem less logical. After careful consideration, I recently decided to transition back to a dedicated desktop setup. Despite being four years old, I plan to retain the Darter Pro, which continues to serve me well during my travels and while assisting clients at their residences.

A lot of research for a bit of PC

Embarking on constructing your computer brings forth a distinct feeling of liberation. Instead of accepting pre-determined choices from a computer manufacturer, you can handpick each component that constitutes your system. Engaging in a do-it-yourself PC project entails an element of risk and adventure and lends a greater sense of accomplishment than a mere purchase.

I diligently conducted research to ensure the compatibility and viability of my selected NUC and its associated components. As part of this process, I switched from Pop!_OS 22.04 to Linux Mint 21.2, which also draws from the Ubuntu 22.04 base. I have relied on Cronopete as my chosen backup solution throughout my journey. Anticipating a smooth installation of Mint, I’m confident that I can seamlessly restore my files, reassuring me of the feasibility of my chosen path.

Assembling the NUC

When the package arrived, I was eager to assemble my new computer. I took the NUC out of its box and looked at the directions. The NUC has four screws in the base, which I loosened until I could easily remove the bottom plate. Once the case was opened, it was easy to see where the RAM chips belonged. I gingerly removed them from their packaging and, one by one, inserting them into their places.

Installing the SSD drive was a bit more complicated. I had to remove a tiny mounting screw before inserting the NVMe drive. A good screwdriver with a magnetic tip is an excellent aid when securing the NVME drive.

It was finally time to see the fruits of my labor. I connected the NUC to a monitor with an HDMI cable, attached the keyboard and mouse to the USB ports, and turned on the device. As the directions instructed, I pressed the F10 key at startup to enter the BIOS and selected the USB drive on which I had previously installed Linux Mint 21.2.

Booting Linux on a NUC

After connecting the NUC to my Logitech wireless keyboard and mouse and a Sceptre 27-inch monitor, I was ready to begin the installation. My first boot was unsuccessful, so I turned off the ‘Secure boot’ option, and on the second boot, Linux Mint came up! A quick check revealed that the wireless was fine, and the keyboard and mouse were both working. The installation took only about 10 minutes. I added my favorite applications, including the Chrome browser, and began to have some fun.

The NUC is certified on several Linux distributions, including Ubuntu, OpenSuse, and Clear Linux.

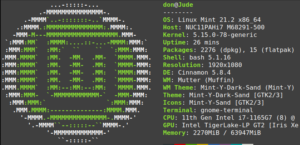
Once the operating system and updates were installed, boot time was much quicker than the NUC 10 I replaced a year ago. I used ‘Neofetch’ for a brief overview of the system.

Give it a try

I use my system primarily for writing, coding, video conferencing, virtualizing other operating systems, and reading. If you are considering building your compact Linux system, this is an excellent option.

Why Linux Mint Could be Your Perfect OS Choice

I have owned several MacBooks and purchased one for my wife a few years ago. She’s not a power user, mainly utilizing it for shopping, email, and discovery. As it approaches the end of its life, each new OS upgrade renders it less usable. Although my wife has never used a Linux computer, transitioning might be smooth. After all, many of her applications are readily available on Linux Mint. Upgrading to Linux Mint could be the best option for her.

Here are five reasons why Linux Mint might be a better choice for the average user than purchasing a new MacBook.

Customizability and Flexibility:

Linux Mint offers a high level of customizability and flexibility. Users can choose from various desktop environments (Cinnamon, MATE, and Xfce) and tweak the system to suit their needs. This level of control is not as readily available in macOS, which is designed to offer a consistent user experience across its devices.

Cost and Accessibility:

Linux Mint offers an open-source and free-to-use platform, while macOS remains exclusive to Apple hardware, leading to higher costs than comparable PCs. For budget-conscious users or those seeking the freedom to install the OS on a wide range of hardware, Linux Mint presents a more affordable and accessible alternative. It’s even possible to install Linux Mint on her MacBook Air.

Software Repository:

Linux Mint gains a significant advantage from its vast software repository, offering users a plethora of free and open-source software. The package manager (APT) streamlines application installation and updates. While macOS also features an extensive collection of applications through the App Store, it fails to rival the sheer number and variety available in Linux’s repositories.

Community and Support:

The Linux Mint community exudes passion and activity, always eager to assist newcomers and experienced users. Online forums, documentation, and community-driven support offer many resources to troubleshoot issues and delve deeper into the OS. While macOS also boasts a strong user base, the open-source community’s nature often fosters more accessible and diverse support channels.

Privacy and Data Control:

Linux Mint empowers users with greater control over their data and privacy. Unlike macOS, which tightly integrates with Apple’s ecosystem and services, Linux Mint enables users to determine data-sharing preferences and recipients. Moreover, being open-source, the operating system’s inner workings remain transparent, facilitating auditing for potential security and privacy concerns.

4 Ways Open Source Software Can Improve Education

Everyone deserves an equal opportunity for a good education. But, we all know that some folks have monetary constraints that make those educational opportunities less likely to occur. I taught in a school district with a high percentage of rural poverty and our students did not have access to the opportunities that their urban and suburban peers. Closing that gap was always on our minds. That’s when we discovered open source software. Here are four ways that open source software levels the playing field for students.

  1. Cost-effectiveness. Open source software like LibreOffice, provides students with state of the art software that ensures that any document they create is theirs to keep and share with their teachers and classmates. Access to the same software with identical file formats ensures that everyone can share information easily. This is especially important for schools and universities that are operating on tight budgets.
  2. Flexibility. Open source software is typically very flexible and customizable.. There is no vendor lock-in. There are no contractual limits on deployment. Every student and teacher can have a copy of the software and they are free to share it with their family too. Support from active communities of users and excellent documentation are key selling points.
  3. Security. The source code of open source software can be inspected by anyone making it less likely that malicious code could be hidden from view and can more easily be found by security teams. Open source software is updated more regularly than proprietary products. This is because the open source community is constantly working to improve the software, and they are able to release updates more quickly.
  4. Collaboration. The open source community is a large and vibrant community of developers who are constantly working to improve open source software. This means that educational institutions can tap into a wealth of expertise and resources when using open source software.

Here are some examples of open source projects and communities that have a direct connection to education.

  • Moodle: Moodle is an open source learning management system (LMS) that is used by millions of students and teachers around the world. Moodle is highly flexible and can be customized to meet the needs of any educational institution.
  • Jupyter Notebooks: Jupyter Notebooks are a popular open source tool for creating and sharing interactive documents that contain code, text, and visualizations. Jupyter Notebooks are an excellent way for students to learn how to code and to share their work with others.
  • GCompris: Gcompris is a free and open-source educational software suite for children aged 2 to 10. It includes a wide range of activities.
  • Gimp: Gimp is a free and open source raster graphics editing package that is used for image editing and manipulation. Gimp is available on Linux, MacOS and Windows.

How Creative Commons Licensing Can Help Build Your Brand and Reputation

Creative Commons licensing is an excellent way to share your creations with others while still retaining control over how they are used. There are many benefits to using Creative Commons licensing, some of which we’ll explore in this article.

First and foremost, Creative Commons licensing allows others to use your work without having to ask for permission. This can be especially useful if you want your work to be used in a specific way or for a specific audience. For example, you might want your work to be used for educational purposes or in a nonprofit setting. With Creative Commons licensing, you can specify exactly how your work can be used and under what conditions.

Another benefit of Creative Commons licensing is that it can help you to build your brand and reputation. By allowing others to use your work, you are increasing exposure to your brand and helping to establish yourself as a thought leader in your field. This can be particularly valuable for small businesses or independent creators who are just starting out.

Creative Commons licensing can also help to foster innovation and collaboration. By sharing your work with others, you are providing a platform for others to build upon and improve upon your ideas. This can lead to new innovations and collaborations that might not have been possible otherwise.

Overall, there are many benefits to using Creative Commons licensing. By sharing your work with others and allowing them to use it in a specific way, you can build your brand, foster innovation, and contribute to the greater good of the creative community. So if you’re looking to share your work with others in a meaningful way, consider using Creative Commons licensing as a tool to help you achieve your goals.

Managing your money on Linux

GnuCash is a popular open-source personal finance or small business accounting for Linux users. It is a full-featured double-entry accounting system that supports multiple accounts, investments, and currency conversions. The app also provides a variety of helpful financial tools, including budgeting, reporting, invoicing and more. GnuCash is a great choice for users who are looking for a comprehensive and powerful financial management solution. GnuCash is my own personal favorite that I have been using everyday for over six years. GnuCash can be installed from the command line or as a Flatpak depending on your distribution and/or personal choice. GnuCash is licensed with Gnu Public License. GnuCash is also available for MacOS and Windows users too.

Homebank is a free, open-source personal finance app for Linux, Windows and MacOS users. It easily imports files from Quicken, Microsoft Money and other software. It also imports from popular bank formats OFX/QFX, QIF and CSV. The source code for Homebank is freely available and licensed with GPL v 2.0. The project provides information about how to download and install on your distribution or operating system.

KMyMoney is a cross-platform double-entry bookkeeping system for personal finance management built on KDE. It’s similar in operation to popular proprietary personal finance applications. KMyMoney also supports multiple accounts and currencies, making it a great choice for users who need to manage their finances in multiple countries. It’s latest stable release was June 2021. It is licensed with Gnu Public License. The project provides download images for Linux, Windows and MacOS.

Skrooge is open source and available for download and install on Linux and BSD. It’s also available on Windows and MacOS. You can import accounts from many sources including AFB120, QIF, CSV, MT940, OFX, QFX. According to their website Skrooge is able to import directly transactions from all your banks web sites in one click. Skrooge provides excellent documentation too.

Welcome to Reclaim

I have been looking for new web hosts to place this blog and thanks to a blogger I met via Mastodon today I’ve settled on Reclaim Hosting. Best part is they’re a site that’s focused on education. Higher education in particular but welcoming students, academics and other folks not necessarily connected to academia. In addition to that delightful mix their hosting fee was very reasonable and I got the domain name I had been toying with. I started blogging in 2006 on Blogger.com but moved to WordPress.com after about a year. I have been on WordPress.com ever since.

I’m grateful for my experience these many years and fortunately for me I was able to download all my posts in a backup file and then move them to this new host. That’s a very nice feature of WordPress. This has been an exciting year in many respects and one of those nice surprises has been moving much of my social networking to Mastodon or in my case Fosstodon. Open source software and open education are my passion. They offer tremendous opportunities to everyone regardless of where you happen to be on the education continuum.

Vostro 1520 Restored with Linux

Today when I came home there was a box sitting in the house waiting for me. My wife said it was a computer my brother-in-law had used in his business. She said, “Dave wanted you to have this computer back now that he’s retired.” I vaguely remember helping Dave get this computer about ten years ago. It’s a Dell Vostro 1520. Checking on the Dell support website I found that the warranty expired nine years ago. The computer came with Windows XP which is what he needed at the time. I checked out the BIOS and determined it had a Core 2 Duo CPU with 2 gigabytes of RAM. It has 300 gigabyte SATA hard disk and Intel wireless.

It was a perfect candidate for Linux Mint XFCE. I made the Mint XFCE 20.1 thumb drive with my desktop computer and fired up the Vostro. I pressed F12 to boot from the USB drive and the install went really well. I ordered a new battery and a memory upgrade to bring it up to 4 GB of RAM. I’ve got a spare 120 GB SSD drive to put into it. Someone will soon be getting a lovely refurbished Dell Vostro 1520 that’s been refitted with Linux. You just have to love Linux and open source. It’s the gift that keeps giving.

Are you looking for a password manager?

Are you looking for a password manager? Password managers abound and many are open source. Which one will you choose? I was letting a browser store my passwords until an upgrade to my system left my browser based solution wanting. That’s when I started looking for a password manager. I looked in the software store of my Linux distribution. I downloaded and tried out a number of them. That list included Keepassx, Keepass2.and Bitwarden. Then I opted for a free proprietary solution. That worked until recently when the free solution put some conditions on the use of their product. 

Last week while listening to Linux Unplugged I heard Chris Fisher recommend Bitwarden. Hindsight is 20/20 and now I wonder why I didn’t choose Bitwarden in the first place. There is value in making mistakes and learning from them. I like that I can install Bitwarden on my computer and have it backed up in the cloud or in my own self hosted solution

The software runs on Windows, MacOS and Linux. You can integrate Bitwarden into your favorite web browser and that list includes Firefox, Chrome, Opera, Safari, Microsoft Edge and others. Bitwarden is mobile too. You can download it for iOS and Android. You can opt to install the software from the command line too. I like that I can access Bitwarden from any computer via the web vault too. I love that the data is fully encrypted end to end with AES-256. Learn more about Bitwarden’s security resources

You can create a Bitwarden account for free. Bitwarden is open source and released under GPL v. 3.0.  You can easily inspect the code. The Bitwarden community is vibrant and it is easy to become a part of that by visiting their forum to learn more about the software and pose questions. You can follow Bitwarden on Twitter and Reddit. The project maintains excellent documentation to help you use it well. 

What is your favorite open source password management solution?

Moving to Mint

I’ve been a Linux user for more than twenty years. I started with Red Hat 6.1 in the late 1990’s. Since then I’ve used a number of distributions and have loved the experience and freedom of open source software. My journey has taken me from Red Hat to Suse then Mandrake. Fedora 1 to Fedora 5 and then Centos and Ubuntu 5.04 in 2005. In the past couple of years I have been running Pop_OS! which I really like. It’s a great implementation of Ubuntu. It’s better than the stock release of Ubuntu Desktop in my estimation.

I first heard of Linux Mint a dozen or more years ago when a community member shared that he used that distribution. Last year a friend asked me to install Linux on an under powered Windows laptop that they owned. In my search to find the right distribution I settled on Linux Mint XFCE. It worked well. Then came the pandemic.

Since March of last year I’ve been helping folks get connected to Zoom and other video conferencing solutions and in all but one case I’ve used Linux. Several of the units I’ve purchased on Ebay came from Free Geek which is a non-profit in Portland, Oregon. Those laptops have come with Linux Mint installed. Most of the time I reinstalled Pop_OS on them. Recently when looking for a Linux solution for an aging Acer laptop with a Pentium processor I opted to install Linux Mint XFCE. It fit the bill perfectly. The client was very happy that a computer that was in their storage closet would now be the solution to their problem created when Google nixed cloud printing and made it impossible to print from their Chromebook to a two year old HP LaserJet multi-function device.

In helping a client find a Linux solution to his problem I decided it was time to try Mint on my System76 Darter Pro. I installed the Cinnamon desktop and had fun learning the nuances of this new interface. I liked it so well that I decided to use it on my Intel NUC desktop. I backed up my files and had Linux Mint 20.1 installed. I’m having fun configuring it the way I like it. Mint comes with a backup solution of it’s own but I opted to install Cronopete which is my favorite backup software. There’s always a learning curve with any new distribution. I’m looking forward to the experience. Thank you Linux for the freedom to choose.