
In the previous year, I acquired a Hewlett-Packard DevOne to replace an Intel NUC 10, which had been serving as my primary workstation. I set up the DevOne with a docking solution detailed in an article I wrote last year, aiming to replace both the NUC and an older Darter Pro I had been using. However, I gradually realized that the DevOne wasn’t quite suitable for me due to its smaller fourteen-inch screen. Given my aging eyes, I needed to adjust accessibility settings, which work better with larger displays.
I must acknowledge that the DevOne is an impressive laptop—crafted with quality and firm performance. Nevertheless, the idea of docking a computer that I never use in a laptop mode started to seem less logical. After careful consideration, I recently decided to transition back to a dedicated desktop setup. Despite being four years old, I plan to retain the Darter Pro, which continues to serve me well during my travels and while assisting clients at their residences.
A lot of research for a bit of PC
Embarking on constructing your computer brings forth a distinct feeling of liberation. Instead of accepting pre-determined choices from a computer manufacturer, you can handpick each component that constitutes your system. Engaging in a do-it-yourself PC project entails an element of risk and adventure and lends a greater sense of accomplishment than a mere purchase.
I diligently conducted research to ensure the compatibility and viability of my selected NUC and its associated components. As part of this process, I switched from Pop!_OS 22.04 to Linux Mint 21.2, which also draws from the Ubuntu 22.04 base. I have relied on Cronopete as my chosen backup solution throughout my journey. Anticipating a smooth installation of Mint, I’m confident that I can seamlessly restore my files, reassuring me of the feasibility of my chosen path.
Assembling the NUC
When the package arrived, I was eager to assemble my new computer. I took the NUC out of its box and looked at the directions. The NUC has four screws in the base, which I loosened until I could easily remove the bottom plate. Once the case was opened, it was easy to see where the RAM chips belonged. I gingerly removed them from their packaging and, one by one, inserting them into their places.
Installing the SSD drive was a bit more complicated. I had to remove a tiny mounting screw before inserting the NVMe drive. A good screwdriver with a magnetic tip is an excellent aid when securing the NVME drive.
It was finally time to see the fruits of my labor. I connected the NUC to a monitor with an HDMI cable, attached the keyboard and mouse to the USB ports, and turned on the device. As the directions instructed, I pressed the F10 key at startup to enter the BIOS and selected the USB drive on which I had previously installed Linux Mint 21.2.
Booting Linux on a NUC
After connecting the NUC to my Logitech wireless keyboard and mouse and a Sceptre 27-inch monitor, I was ready to begin the installation. My first boot was unsuccessful, so I turned off the ‘Secure boot’ option, and on the second boot, Linux Mint came up! A quick check revealed that the wireless was fine, and the keyboard and mouse were both working. The installation took only about 10 minutes. I added my favorite applications, including the Chrome browser, and began to have some fun.
The NUC is certified on several Linux distributions, including Ubuntu, OpenSuse, and Clear Linux.
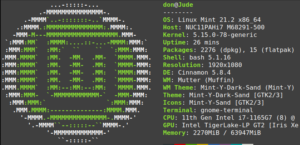
Once the operating system and updates were installed, boot time was much quicker than the NUC 10 I replaced a year ago. I used ‘Neofetch’ for a brief overview of the system.
 Give it a try
I use my system primarily for writing, coding, video conferencing, virtualizing other operating systems, and reading. If you are considering building your compact Linux system, this is an excellent option.