There are several open-source tools available this year for creating holiday cards. If you have a wonderful photo of your family or grandchildren, but it was taken during a different season and you’d like to change the background, there’s a Python module called rembg that can help you with that. To get started, you’ll need to set up a Python virtual environment and install the necessary dependencies. I created a directory named rembg using the following command:
$ mkdir rembg
Then I setup a Python virtual environment.
python3 -m venv /home/don/rembg
Then I activate the environment with the following command.
source /home/don/rembg/bin/activate
Then I install rembg:
pip3 install rembg
I want to use rembg from the command line so I make the following additional installation:
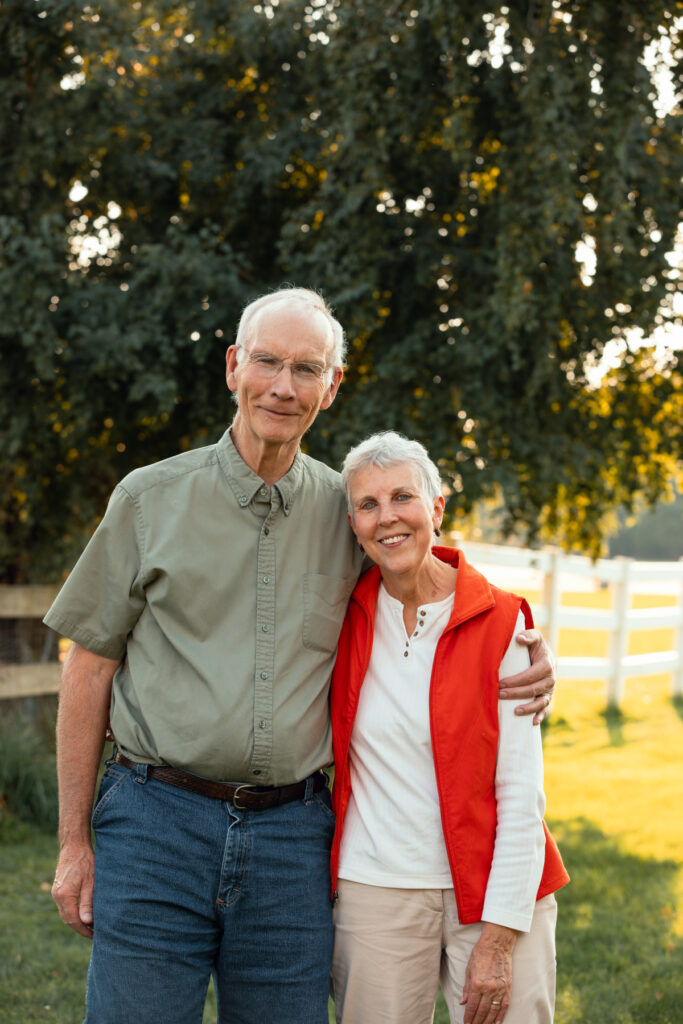
Now I am ready to remove the background from the image that I have chosen. This is a recent picture of my wife and I taken in the fall of the year. I like the picture but I want it to have a festive background.
I make sure that my image is in the rembg folder and then execute the following command. The i switch means that I am operating at the file level.
rembg i grandparents.jpg grandparents_no_bg.jpg
In the command above I renamed the output file so that I would still have my original just in case I wanted to use it again. You can see below that the background has been removed from the image above.
I can create a nice background for my card with InkScape and add some festive lettering and use a Pointsettia I downloaded from Openclipart.org. The completed card is shown below.
Created with InkScape, OpenClipart.org by Don Watkins CC by SA 4.0
Rembg is open source with an MIT License. Onnxruntime is open source with an MIT License.
I have been using Mastodon for almost six years. I continue to be amazed at the quality of discourse and the diverse community of educators and folks interested in education in the Fediverse. If you are a person who is accustomed to algorithm driven centralized social networks then Mastodon is going to seem a bit unusual at first. If you are WordPress user you can connect your blog to Mastodon with the ActivityPub plugin. You don’t need a blog to connect to Mastodon. You just need to create an account on anyone of dozens of Mastodon instances that exist around the world. One you are connected to an instance you can find other users and connect to them whether they are on your particular server instance or not.
A toot on Mastodon is typically five hundred characters long. Like other microblogging platforms you may have used before brevity is prized but there’s more than enough space to get your information across and then you use hashtags to let your audience know what your toot is about.
Here’s a list of twenty-one educators currently using Mastodon.
In conclusion, Mastodon offers a refreshing alternative to traditional, algorithm-driven social networks. Its decentralized nature and vibrant community provide an enriching environment for educators and those passionate about education. Whether you’re sharing your thoughts, discovering new ideas through hashtags, or connecting your WordPress blog with the ActivityPub plugin, Mastodon opens up a world of possibilities. Embrace the change and dive into meaningful conversations on this unique platform. Happy tooting!
Continuing my exploration of using a locally hosted Ollama on my Linux desktop computer, I have been doing a lot of reading and research. Today, while having lunch with a university professor, he asked me some questions I didn’t have an immediate answer to. So, I went back to my research to find the answers.
My computer is a Linux desktop with an 11th-generation Intel Core i7-1165G7 processor and 64 gigabytes of RAM. Until today, I have been interacting with Ollama and several models, including Gemma, Codegemma, Phi-3, and Llama3.1, from the command line. Running the Ollama command-line client and interacting with LLMs locally at the Ollama REPL is a good start, but I wanted to learn how to use Ollama in applications and today I made a good start.
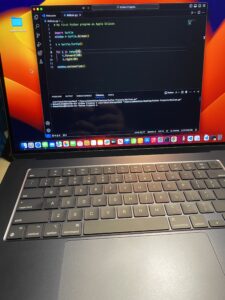
Python is my preferred language, and I use VS Codium as my editor. First, I needed to set up a virtual Python environment. I have a ‘Coding’ directory on my computer, but I wanted to set up a separate one for this project.
$ python3 -m venv ollama
Next, I activated the virtual environment:
$ source ollama/bin/activate
Then, I needed to install the ‘ollama’ module for Python.
pip install ollama
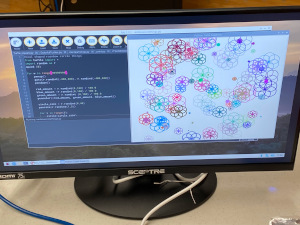
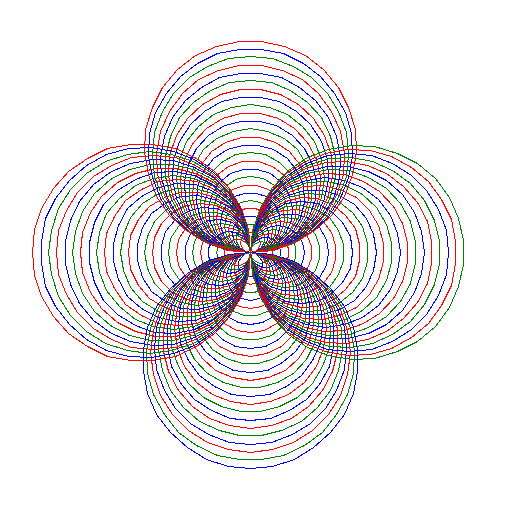
Once the module was installed, I opened up VSCodium and tried the code snippet. I found that I used the ‘ollama list’ command to make sure that ‘codegemma’ was installed. Then I used a code snippet I found online and tailored it to generate some Python code to draw a circle.
import ollama


response = ollama.generate(model='codegemma', prompt='Write a Python program to draw a circle spiral in three colors')
print(response['response'])
The model query took some time to occur. Despite having a powerful computer, the lack of a GPU significantly impacted performance, even on such a minor task. The resulting code looked good.
import turtle

# Set up the turtle
t = turtle.Turtle()
t.speed(0)

# Set up the colors
colors = ['red', 'green', 'blue']

# Set up the circle spiral parameters
radius = 10
angle = 90
iterations = 100

# Draw the circle spiral
for i in range(iterations):
    t.pencolor(colors[i % 3])
    t.circle(radius)
    t.right(angle)
    radius += 1

# Hide the turtle
t.hideturtle()

# Keep the window open
turtle.done()
Everywhere you look, someone is talking or writing about artificial intelligence. I have been keenly interested in the topic since my graduate school days in the 1990s. I have used ChatGPT, Microsoft Copilot, Claude, Stable Diffusion, and other AI software to experiment with how this technology works and satisfy my innate curiosity. Recently, I discovered Ollama. Developed by Meta, it is an open-source large language model that can run locally on Linux, MacOS, and Microsoft Windows. There is a great deal of concern that while using LLMs in the cloud, your data is being scraped and reused by one of the major technology companies. Ollama is open-source and has an MIT license. Since Ollama runs locally, there is no danger that your work could end up in someone else’s LLM.
The Ollama website proclaims, “Get up and running with Large Language Models.” That invitation was all I needed to get started. Open a terminal on Linux and enter the following to install Ollama:
curl -fsSL https://ollama.com/install.sh | sh
The project lists all the models that you can use, and I chose the first one in the list, Llama3.1. Installation is easy, and it did not take long to install the Llama3.1 model. I followed the instructions and, in the terminal, entered the following command:
$ ollama run llama3.1
The model began to install, which took a couple of minutes. This could vary depending on your CPU and internet connection. I have an Intel i7 with 64 GB RAM and a robust internet connection. Once the model was downloaded, I was prompted to ‘talk’ with the LLM. I decided to ask a question about the history of my alma mater, St. Bonaventure University. I entered the following commands:
$ ollama run llama3.1
>>>What is the history of St. Bonaventure University?
The results were good but somewhat inaccurate. “St. Bonaventure University is a private Franciscan university located in Olean, New York. The institution was founded by the Diocese of Buffalo and has a rich history dating back to 1856.” St. Bonaventure is located near Olean, New York, and it is in the Diocese of Buffalo, but it was founded in 1858. I asked the model to name some famous St. Bonaventure alumni; more inaccuracies were comic. Bob Lanier was a famous alumnus but Danny Ainge was not.
The results are rendered in MarkDown, which is a real plus. I also knew that having a GPU would render the results much quicker. I wanted to install Ollama on my M2 MacBook Air which I soon did. I followed the much easier directions: Download the Ollama-darwin.zip, unzip the archive, and double-click the Ollama icon. The program is installed in the MacBook’s Application folder. When the program is launched, it directs me to the Mac Terminal app, where I can enter the same commands I had entered on my Linux computer.
Unsurprisingly, Ollama uses a great deal of processing power, which is lessened if you run it on a computer with a GPU. My Intel NUC 11 is a very powerful desktop computer with quad-core 11th Gen Intel Core i7-1165G7, 64 gigabytes of RAM, and a robust connection to the internet to download additional models. I posed similar questions to the Llama3.1 model first on the Intel running Linux and then on the M2 MacBook Air running MacOS. You can see the CPU utilization below on my Linux desktop. It’s pegged, and the output from the model is slow at an approximate rate of 50 words per minute. Contrast that with the M2 MacBook, which has a GPU with a CPU utilization of approximately 6.9% and words per minute faster than I could read.
Screen picture by Don Watkins CC by SA 4.0
While Ollama Llama3.1 might not excel at history recall, it does very well when asked to create Python code. I entered a prompt to create Python code to create a circle without specifying how to accomplish the task. It rendered the code shown below. I had to install the ‘pygame’ module, which is not on my system.
$ sudo apt install python3-pygame
# Python Game Development

import pygame
from pygame.locals import *

# Initialize the pygame modules
pygame.init()

# Create a 640x480 size screen surface
screen = pygame.display.set_mode((640, 480))

# Define some colors for easy reference
WHITE = (255, 255, 255)
RED = (255, 0, 0)

while True:
    # Handle events
    for event in pygame.event.get():
        if event.type == QUIT or (event.type == KEYDOWN and event.key ==
K_ESCAPE):
            pygame.quit()
            quit()

    screen.fill(WHITE)  # Fill the background with white color

    # Drawing a circle on the screen at position (250, 200), radius 100
    pygame.draw.circle(screen, RED, (250, 200), 100)

    # Update the full display Surface to the screen
    pygame.display.flip()
I copied the code into VSCodium and ran it. You can see the results below.
Screen picture by Don Watkins CC by SA 4.0
As I continue experimenting with Ollama and other open-source LLMs, I’m struck by the significance of this shift toward local, user-controlled AI. No longer are we forced to rely on cloud-based services that may collect our data without our knowledge or consent. With Ollama and similar projects, individuals can harness the power of language models while maintaining complete ownership over their work and personal information. This newfound autonomy is a crucial step forward for AI development and I’m eager to see where it takes us.
It’s been a few years since I purchased a MacBook. My last Mac was a MacBook Pro I bought in the spring of 2020. Since then, I’ve been using Linux exclusively. My desktop is an Intel NUC 11 that’s running Linux Mint Cinnamon, and I’ve no plans to change that anytime soon. However, I’ve heard lots of good reviews of Apple Silicon. I experimented with a MacMini with the M1 chip a bit over a year ago but sent it back and purchased an HP DevOne, which I had docked for just about a year.
When I upgraded to the NUC 11, the DevOne became an extra laptop. I’ve been using it since August in that capacity. Last month I took it to All Things Open and used it for note-taking, writing, and tooting. I was disappointed in its battery life and the 14-inch display was not enough for a guy who’s used to more desktop real estate.
I was attracted to the MacBook Air M2’s 15.3-inch display. My eyes aren’t what they used to be, and I need bigger fonts on a bigger display. I read many reviews and visited the Apple Store nearby to inspect this new Mac. I was impressed and almost purchased a unit that day. I decided to walk around the mall and left without purchasing the MacBook. More positive reviews and commentary from some of the open-source podcasts I listen to. That led me to purchase this unit on a ‘Black Friday’ deal from Amazon. The MacBook Air arrived today and got it configured the way I wanted to. I installed the latest Python from Python.org and Visual Studio Code .
I wanted to ensure that I could use this new laptop to continue to hone my Python skills.
I used HomeBrew to install some of my other favorite open-source apps which included GnuCash, MacDown, and Joplin. I’m not doing any heavy lifting with this laptop but I was attracted by its reported long battery life. This MacBook Air M2 came with 256 GB SSD and 8 GB RAM. I like the feel of the keyboard and the overall performance and build quality. There are no readily apparent downsides to this new purchase.
Turtle graphics, a popular approach to introducing young learners to programming, traces its roots back to the original Logo programming language. Logo, an educational programming language designed by Seymour Papert and others in 1967, played a significant role in the development of this technique.
My personal journey with Logo began during my time as a graduate student in education. As a young adult, I struggled with mathematics, finding abstract concepts elusive and distant, while others seemed to grasp them effortlessly. Mathematics became an enigma, something I couldn’t connect with. However, everything changed when I entered graduate school and was given the task of teaching geometry to a fifth-grade student using a special curriculum that leveraged Logo and its Turtle graphics feature.”
A friend suggested several years ago that I learn Python. I had dabbled with computer programming but never stuck with it. He invited me to sit in on a staff development session on using Python in educational settings. Fortunately for me, he introduced them to the Python ‘turtle module.’ There was a connection immediately to my earlier experiences with Apple LOGO, and I began to experiment. I was comfortable on the command line but new to the Python REPL. Nonetheless, I opened a new session and began by importing the ‘turtle module.’
don@pop-os:~$ python3
Python 3.10.12 (main, Jun 11 2023, 05:26:28) [GCC 11.4.0] on linux
Type "help", "copyright", "credits" or "license" for more information.
>>>
I imported the turtle module and followed my friend’s example. He was on a MacOS computer while I was using a Linux laptop. The results were nearly identical, though.
I enjoyed moving the turtle around the screen and drawing some simple shapes. The true potential of Turtle lies not merely in its capacity to execute commands but in its ability to foster procedural thinking and encourage students to reflect on their thought processes. With the aid of Turtle graphics, programming students can receive instant visual feedback from their code and simultaneously explore mathematical concepts, such as estimation and variability.
Reading books like “Teach Your Kids to Code” by Bryson Payne and “Python for Kids” by Jason Briggs, I learned more about the ‘Turtle’ and Python in general. My love of learning and teaching invited me to think of how I could share this with others. In the past half dozen years, I have taught homeschool classes and conducted workshops in public libraries.
I recently completed a three-day session in a nearby public library. Each of the participating youngsters received a Raspberry Pi 400, which they learned to set up and connect to library-supplied displays and the local area network. The main focus of our classes was getting them started programming with Python. We used the Mu editor included with the Raspberry Pi operating system. In a bit less than three days, the students learned how to program the turtle using simple commands at first, then progressed to ‘for’ loops and the ‘random’ module. Each of the participants was able to take their library-supplied Raspberry Pi 400 home with them.
There is nothing more exciting than seeing students excited about learning. I encourage you to share your skills with young learners wherever and whenever you can.


 I enjoyed moving the turtle around the screen and drawing some simple shapes. The true potential of Turtle lies not merely in its capacity to execute commands but in its ability to foster procedural thinking and encourage students to reflect on their thought processes. With the aid of Turtle graphics, programming students can receive instant visual feedback from their code and simultaneously explore mathematical concepts, such as estimation and variability.